
The Complete AV Guide for Designing a High-Impact 10×20 Trade Show Booth
A 10×20 trade show booth gives you room to build something impressive, but it also forces every design decision to be intentional. When you add AV into the mix, the stakes rise quickly. LED walls, monitors, audio, cabling, mounts, content formatting, power requirements — each piece shapes how attendees see, hear, and remember your brand.
For first-time exhibitors or small marketing teams, this is where things often unravel. You walk onto the show floor, plug in your screens, and suddenly nothing fits the way you expected. Screens are too low. Content doesn’t scale correctly. Speakers are too loud for the aisle. And your booth that looked great on a PDF layout suddenly feels flat.
This guide cuts through the noise. Whether you’re preparing for a show in Las Vegas, Dallas, Orlando, Chicago, New Orleans, or any other major market AVR Expos services, this is the blueprint to plan a clean, high-impact AV setup for a 10×20 space.
Begin With the Visual Anchor: Your Primary Screen
Every 10×20 booth needs one clear focal point. For most exhibitors, it’s the main display.
That could be:
- A 98-inch commercial 4K monitor
- A mid-size LED wall (for example, 8’ × 12’)
- A set of two 55–65-inch monitors mirrored on each side
- A touchscreen kiosk acting as both a display and interaction point
The goal isn’t to fill the space. The goal is to control where the eye goes.
LED or LCD? Pick Based on Experience, Not Trend
Choose LED when:
- You want a seamless digital backdrop
- You need high brightness to stand out
- Your content is motion-heavy or stylized
- You want your booth to look modern, clean, and premium
Choose LCD when:
- You prefer multiple smaller screens for different zones
- You want touch capability
- You’re doing software demos or interactive content
LED walls dominate visually, but LCD monitors deliver clarity and consistency for applications that need precision.
Screen Height and Placement: The Sightline Rule
Screen height is one of the top AV mistakes exhibitors get wrong.
The center of your primary display should be:
- At least 6 feet high
- Angled slightly toward aisle traffic
- Positioned so attendees walking by can see it unobstructed
If you mount it too low:
- People block the view
- It loses visibility from the aisle
- The booth feels cluttered
Your main screen is your billboard. Treat it like one.
Multi-Screen Configurations for a 10×20 Space
A 10×20 booth can support multiple screens without looking chaotic if you plan correctly.
Layout 1: “Command Center” Setup
- One large LED wall as the anchor
- Two side monitors for supplemental content
- One touchscreen kiosk for demos
This layout is ideal for companies with complex products or multi-step presentations.
Layout 2: “Dual Engagement” Setup
- Two 65-inch monitors on each short wall
- One reception counter with hidden cabling
- No LED wall, but strong content flow
This format drives interaction from both sides of the booth.
Layout 3: “Digital Backdrop” Setup
- One LED wall (8’ × 12’ or similar)
- Minimal furniture
- A single touchscreen up front for lead capture
It’s clean, modern, and highly visible from the aisle.
Audio Strategy: Clear, Direct, and Controlled
Audio can easily overwhelm a 10×20 booth. You’re sharing space with dozens of exhibitors, and every booth is fighting for attention.
What not to use:
- Subwoofers that shake nearby booths
- Full PA systems that are too loud and overpowering
- Cheap Bluetooth speakers that are inconsistent and unreliable
What works best:
- Two 8-inch powered speakers
- Minimal volume — just enough for your zone
- A wireless handheld mic for demos or small presentations
- Directional audio that aims toward the interior of your booth
Your goal is clarity, not volume.
Cable Management: The Hidden Part Everyone Notices
Messy cabling kills booth presentation. Great AV is invisible until it fails.
AVR Expos technicians typically:
- Run power beneath the raised floor or along truss lines
- Hide cabling behind the LED wall or back side blocking
- Use black cable sleeves to blend with flooring
- Anchor everything to avoid tripping hazards
When done correctly, attendees should never see your wires, connections, or processors.
Content Strategy: The Most Overlooked Part of AV Planning
Your AV is only as good as the content running on it.
Content formatting essentials:
- Match LED content to exact pixel dimensions
- Don’t stretch 1080p content to fill a 4K display
- Keep text large enough to read from 10–20 feet away
- Use looping videos no longer than 20–30 seconds
Content types that work best:
- Animated product demos
- Motion graphics that pull attention
- Testimonials or partner spotlights
- Feature highlights with bold typography
- QR codes that drive deeper engagement
Your content shouldn’t just communicate. It should attract.
Power Requirements: Avoid Last-Minute Surprises
A 10×20 booth typically needs anywhere from 10 to 30 amps, depending on your AV load-out.
Typical requirements:
- LED wall: 10–20 amps depending on pitch and brightness
- Monitors: 1–2 amps each
- Speakers and audio gear: 3–5 amps
- Touchscreens: 2–3 amps
- Lighting: 1–3 amps per fixture
Order more power than you think you’ll need. Convention centers charge premium “add-on” rates onsite.
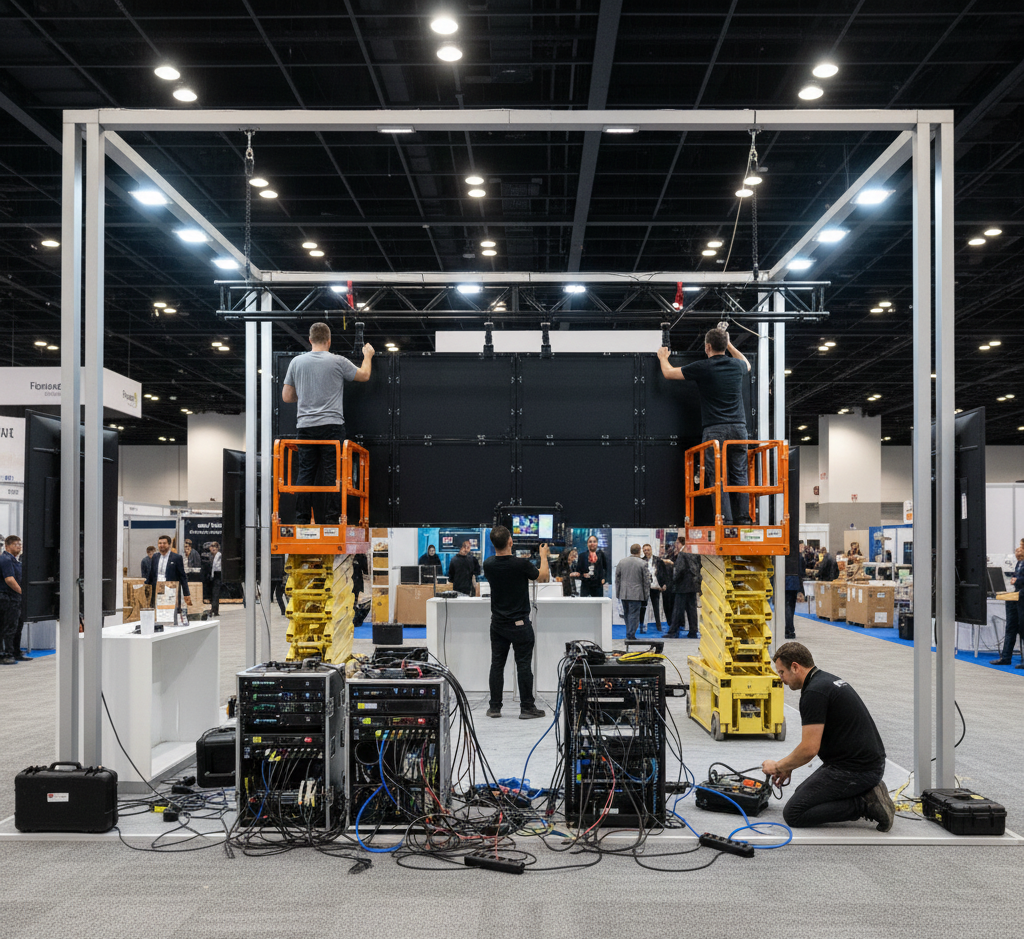
Setup Timing: How Long Does It Really Take?
For a standard 10×20 booth, plan on:
- LED wall setup: 2–4 hours
- Monitor installation: 1–2 hours
- Audio setup: 30–60 minutes
- Testing and calibration: 1 hour
If your booth opens at 10:00 a.m., plan to be set by 8:00 a.m.
If your show opens Monday, install on Sunday.
FAQs
Q1: Can I use both LED and monitors in the same booth?
Absolutely. Many of the most successful 10×20 booths combine technologies for layered engagement.
Q2: Does AVR Expos provide setup and strike?
Yes. We handle full delivery, installation, calibration, and teardown.
Q3: What’s the best screen size for a 10×20?
Either an 8’ × 12’ LED wall or a 75–98-inch 4K monitor, depending on your content goals.


